# 第一章:周介绍
- 掌握脚手架发布模块的整体架构设计和实现原理
- 掌握前端发布流程,并了解 history 和 hash 两种路由模式的区别
- 深入理解 vue-router 原理
关键词
- 前端发布
- 前端路由
- vue-router
# 第二章:脚手架发布流程架构设计
2-1 脚手架发布功能和流程讲解
- 不依靠后端或服务端人员,使用脚手架快速对更改的内容进行项目发布。
- imooc-cli --packagePath /Users/liugezhou/Desktop/imooc-cli/packages/publish
- git 配置检查:保证远程仓库存在
- git 自动提交(输入 commit 信息):避免本地代码提交的繁杂操作
- 云构建+云发布:检查 build 结果、按照依赖、云构建、云发布、云断开
点击查看【processon】 (opens new window)
2-2 绘制项目发布架构设计图 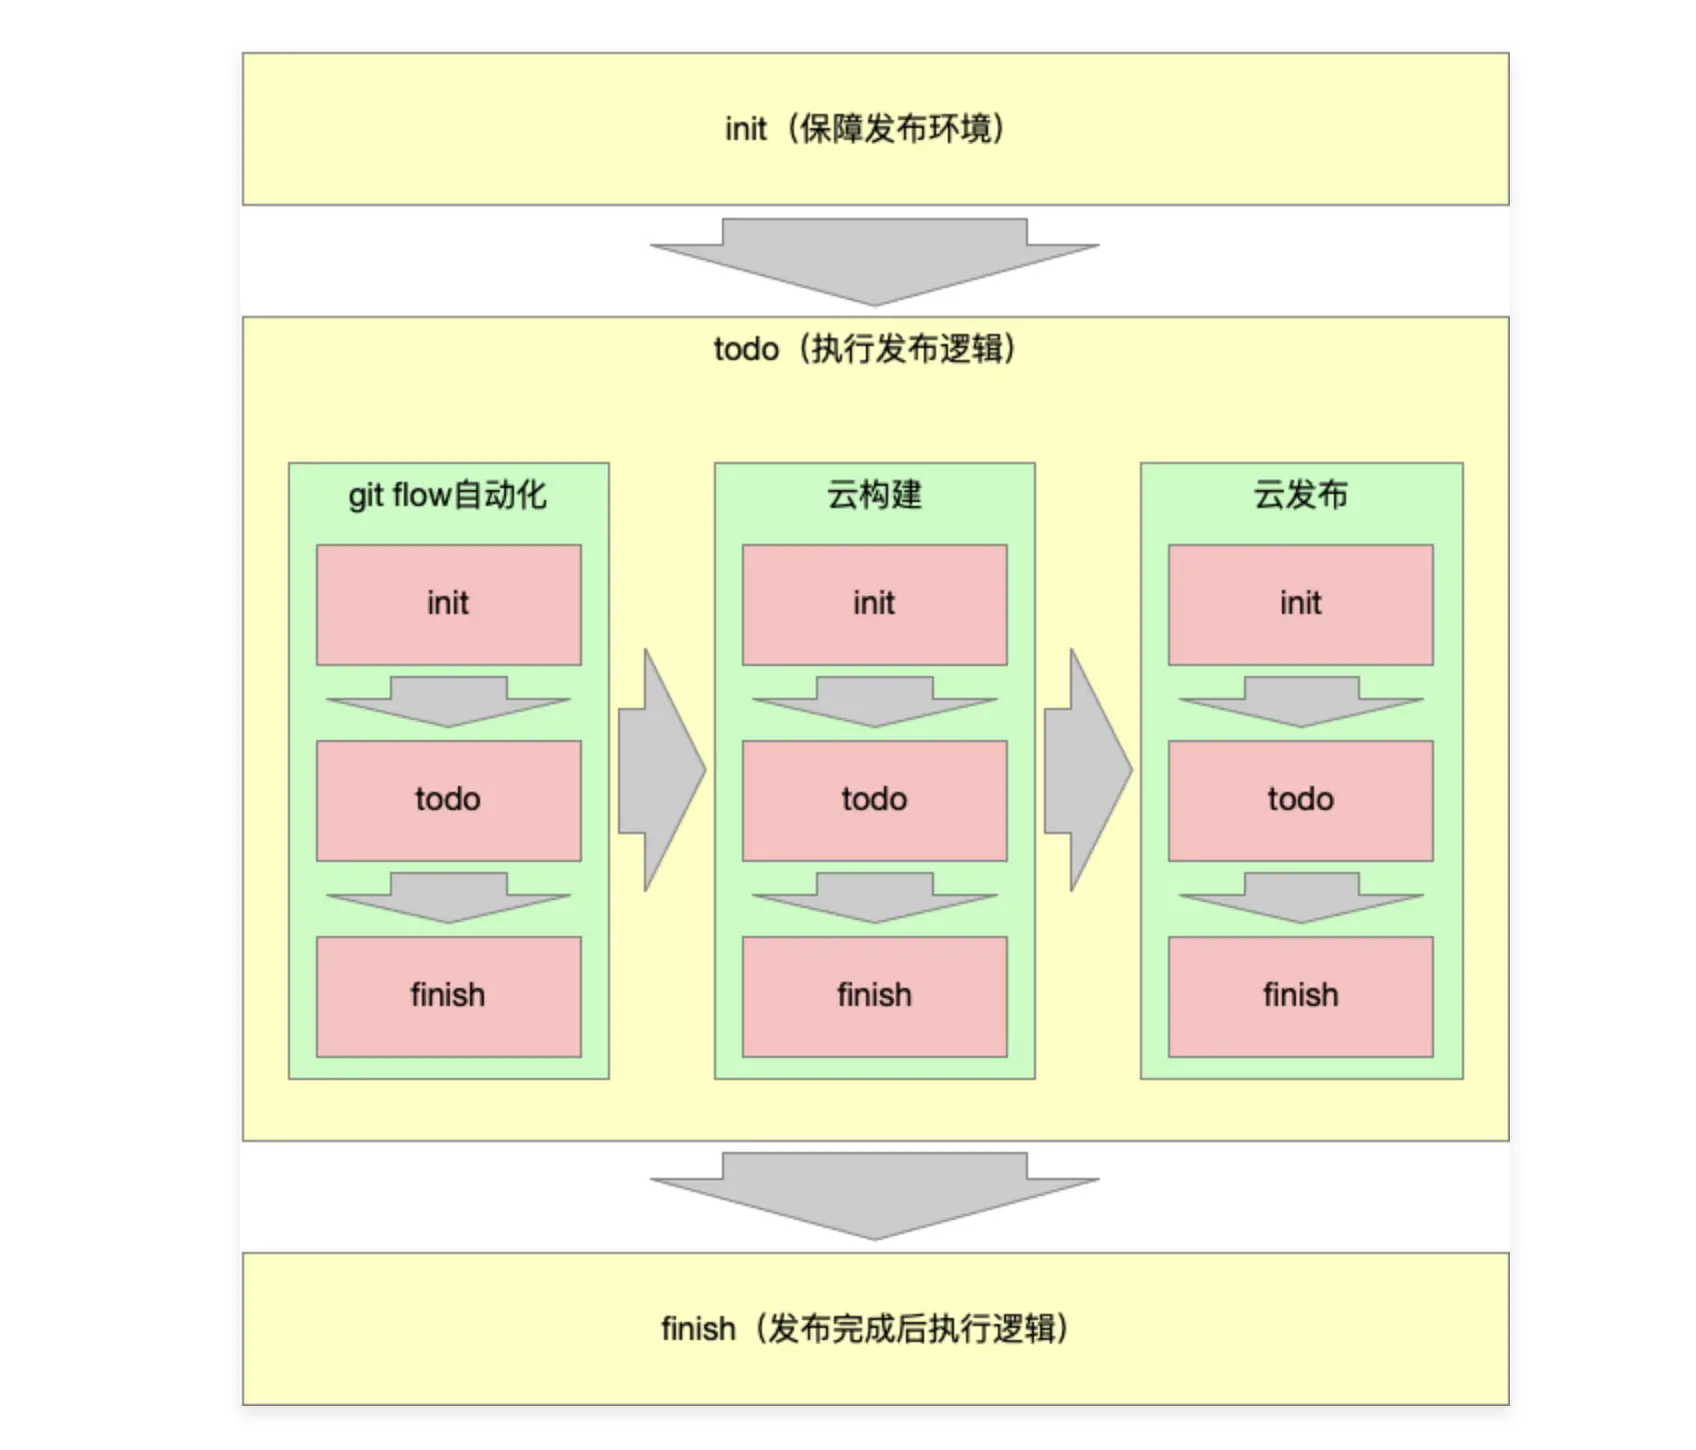
# 第三章:imooc-cli 脚手架 git flow 自动化架构设计
3-1 git flow 基础流程讲解
- git flow 是 2010 年 Vincent Driessen 设计出来的。
点击查看【processon】 (opens new window)
3-2 git flow 多人协作流程讲解(详细讲解大厂 git flow 流程) 点击查看【processon】 (opens new window)
3-3 脚手架 git flow prepare 阶段架构设计 ProcessOn 画图
3-4 脚手架 git flow 执行阶段架构设计 -Init ProcessOn 画图
# 第四章 imooc-cli 脚手架云构建 + 云发布架构设计
4-1 云构建+云发布整体流程设计 4-2 云构建+云发布详细流程设计 1 4-3 云构建+云发布详细流程设计 2 4-4 深入讲解云发布原理 点击查看【processon】 (opens new window)
# 第五章:imooc-cli 脚手架 publish 模块开发
5-1 创建 publish 模块 本模块在调试的时候出现问题:
- lerna create @cloudscope-cli/publish commands
- publish 模块下 lib 的 index 中,打印日志:console.log('publish')
- 接着使用 webstorm 调试 exec 的时候,debug 没有进去。
- 参数为:
- Node parameters:/Users/liugezhou/Documents/imoocCourse/Web 前端架构师/cloudscope-cli/core/cli/bin/index.js publish --targetPath /Users/liugezhou/Documents/imoocCourse/Web 前端架构师/cloudscope-cli/commands/publish
- Working directory: ~/Desktop/test
查找原因为:
- 首先将本地连接全部去除 : 进入到 node 的 modules 目录下将相关的脚手架 liugezhou 的 cloudscope 的全部删除
- 进入到 cloudscope-cli/core/cli 下 npm install
- 发现在 utils 下等有一些 package2 的包,于是去到相关包下,删除重新安装
- npm install 正确后,npm link,link 完毕之后在本地 which cloudscole-cli 看到有了包
- 然后在 webstorm 中调试的 Node parameters 中重新配置(在 publish 之前加空格)
最后在一个空目录中输入以下命令进行调试: cloudscope-cli publish --targetPath /Users/liugezhou/Documents/imoocCourse/Web 前端架构师/cloudscope-cli/commands/publish 打印出:publish
5-2 publish 基本流程开发 接下来的重点就是编写业务代码:cloudscope-cli/commands/publish/lib/index.js
- 参考 init 中的代码,extends Command
- 必须实现 init 和 exec 方法,否则报错
- 该文件中用到的 log / Command 等需要 npm install 引入
'use strict'
const Command = require('@cloudscope-cli/command')
const log = require('@cloudscope-cli/log')
class PublishCommand extends Command {
  init() {
    // 处理参数
    console.log('init', this._argv)
  }

  async exec() {
    try {
      const startTime = new Date().getTime()
      //1. 初始化检查
      this.prepare()
      //2.Git Flow自动化

      //3.云构建 + 云发布
      const endTime = new Date().getTime()
      log.info('本次发布耗时', Math.floor(endTime - startTime) / 1000 + '秒')
    } catch (e) {
      log.error(e.message)
      if (process.env.LOG_LEVEL === 'verbose') {
        log.error(e.message)
      }
    }
  }

  prepare() {}
}

function init(argv) {
  return new PublishCommand(argv)
}
module.exports = init
module.exports.PublishCommand = PublishCommand
5-3 项目发布前预检查流程开发
结合上一节代码,本节主要内容为:
- 初始化检查 prepare
- 确认项目是否 npm 项目
- 确认项目的 package.json 中是否包含 name/version/scripts/scripts.build
prepare(){
  // 1.确认项目是否为npm项目
  const projectPath =  process.cwd()
  const pkgPath = path.resolve(projectPath,'package.json')
  log.verbose('package.json',pkgPath)
  if(!fs.existsSync(pkgPath)){
    throw new Error('package.json不存在')
  }
  //2. 确认是否包含name\version\build命令
  const pkg = fse.readJsonSync(pkgPath)
  const {name,version,scripts} = pkg
  if(!name || !version || !scripts || !scripts.build ){
    throw new Error('package.json信息不全,请检查是否存在name、version和scripts(需提供build命令)')
  }
  this.projectInfo = {name,version,dir:projectPath}
}
# 第六章 本周加餐:前端路由模式原理和 vue-router 源码讲解
本章内容测试代码上传至:https://github.com/liugezhou/vue-router-demo (opens new window)
6-1 vue-router-next 完整运行流程解析
vue-router-next 源码解析 vue-router 常见问题:
- history 和 hash 模式的区别是什么(涉及 vue-router 路由模式和前端发布原理)
- Vue dev 模式下为什么不需要配置 history fallback(涉及 webpack-dev-server 配置)
- 我们没有定义 router-link 和 router-view,为什么代码里能直接使用(涉及 vue-router 初始化流程和 Vue 插件)
- 浏览器如何实现 URL 变化但页面不刷新(涉及 vue-router history 模式核心实现原理)
- vue-router 如何实现路由匹配(涉及 vue-router Matcher 实现原理)
- router-view 如何实现组件动态渲染?(涉及 Vue 动态组件)
通过 imooc-cli 脚手架安装一个 vue3 标准模版
- npm install -g @imooc-cli/core
- imooc-cli init test
- npm install -S vue-router(package.json 中安装的版本为 3.5.2,我们需要手动改成 4.0.0-0,然后安装)
- 新建三个组件 src/pages/Home.vue | src/pages/Order.vue | src/pages/My.vue
- 新建 src/router.js
- 并在 main.js 中引入,app.use(router)
- 在 App.vue 中使用
<router-link/>和<router-view/>
// src/router.js
const {createWebHistory,createRouter} from 'vue-router',
import Home from './pages/Home'
import My from './pages/My'
import Order from './pages/Order'

const routes = [{
    path:'/',name:'root',redirect:'/home'
},{
    path:'/home',name:'home',component:Home
},{
    path:'/my',name:'my',component:My
},{
    path:'/order',name:'order',component:Order
}]

const routerHitory = createWebHistory()
const router = createRouter({
	history:routerHitory,
  routes
})

export default router;

// App.vue
<template>
  <div id="vue3">vue3 template</div>
  <router-link to='/home'>Home | </router-link>
  <router-link to='/order'>Order | </router-link>
  <router-link to='/my'>My | </router-link>
  <router-view />
</template>

<script>
export default {
  name: 'Vue3',
}
</script>

<style>
#vue3 {
  width: 100%;
  height: 100%;
}
</style>
6-2 vue-router 路由模式+history 路由部署详细教学
Vue-router 路由模式
- hash:createWebHashHistory()
- history:createWebHistory()
hash 和 history 模式的区别
- 语法结构不同 :hash 添加#意味着一个辅助说明,#后面参数发送改变后并不会加载资源,history 模式只要路径改变就会重新请求资源,但是如果页面刷新的话 hash 和 history 都是会重新加载资源的。
- 部署方式不同(history 部署)
- npm run build
- nginx 静态网站服务器配置文件如下
- localhost:8081 访问后,换不同的路由,页面刷新会显示 404
- 此时根据 Vue 文档,Fallback,在 nginx 配置文件需要加入如下一行代码
- try_files: $uri $uri/ /index.html;
server {
       listen       8081;
       server_name resource;
       root /Users/liugezhou/XXXXX/dist;
       autoindex on;
       location / {
         //跨域设置
          add_header  Access-Control-Allow-Origin *;
          try_files: $uri  $uri/ /index.html;
       }
			  // 缓存设置
       add_header   Cache-Control "no-cache, must-revalidate";
    }
- SEO:hash 不友好,实际开发应用为 history 模式。
- history 模式跳转,利用的是浏览器对象中的 history.pushState/replaceState/back/go/forward
- hash 模式跳转,利用的是浏览器对象中的 location.href
6-3 vue-cli 源码调试+dev 模式 history fallback 原理讲解
为什么 Vue 的 dev 模式下不需要配置 history fallback?
说明:我们在 dev 模式下启动项目:npm run serve,在 scripts 中 serve,实际执行的命令是 vue-cli-service serve,这个时候我们调试源码就在node_modules/.bin/vue-cli-service。如果执行全局 vue create,调试该命令的话我们就需要去本地全局安装的 vue 源码中去调试。
这个node_modules/.bin/vue-cli-service其实是 link 文件,我们通过 ll node_modules/.bin/vue-cli-service 就可以看出来。=》../@vue/cli-service/bin/vue-cli-service.js
在 webstorm 中新建 Node.js 调试,Node parameters 为:./node_modules/@vue/cli-service/bin/vue-cli-service.js serve
然后在上面的文件中打断点,开始进入 debug 调试模式。
跟着视频课程的调试,核心代码就是 webpack 的 genHistoryApiFallbackRewrites 与 try_files 一样的作用
6-4 vue-router 初始化过程源码分析
我们并没有定义 router-link 和 router-view,为什么代码里能直接使用?
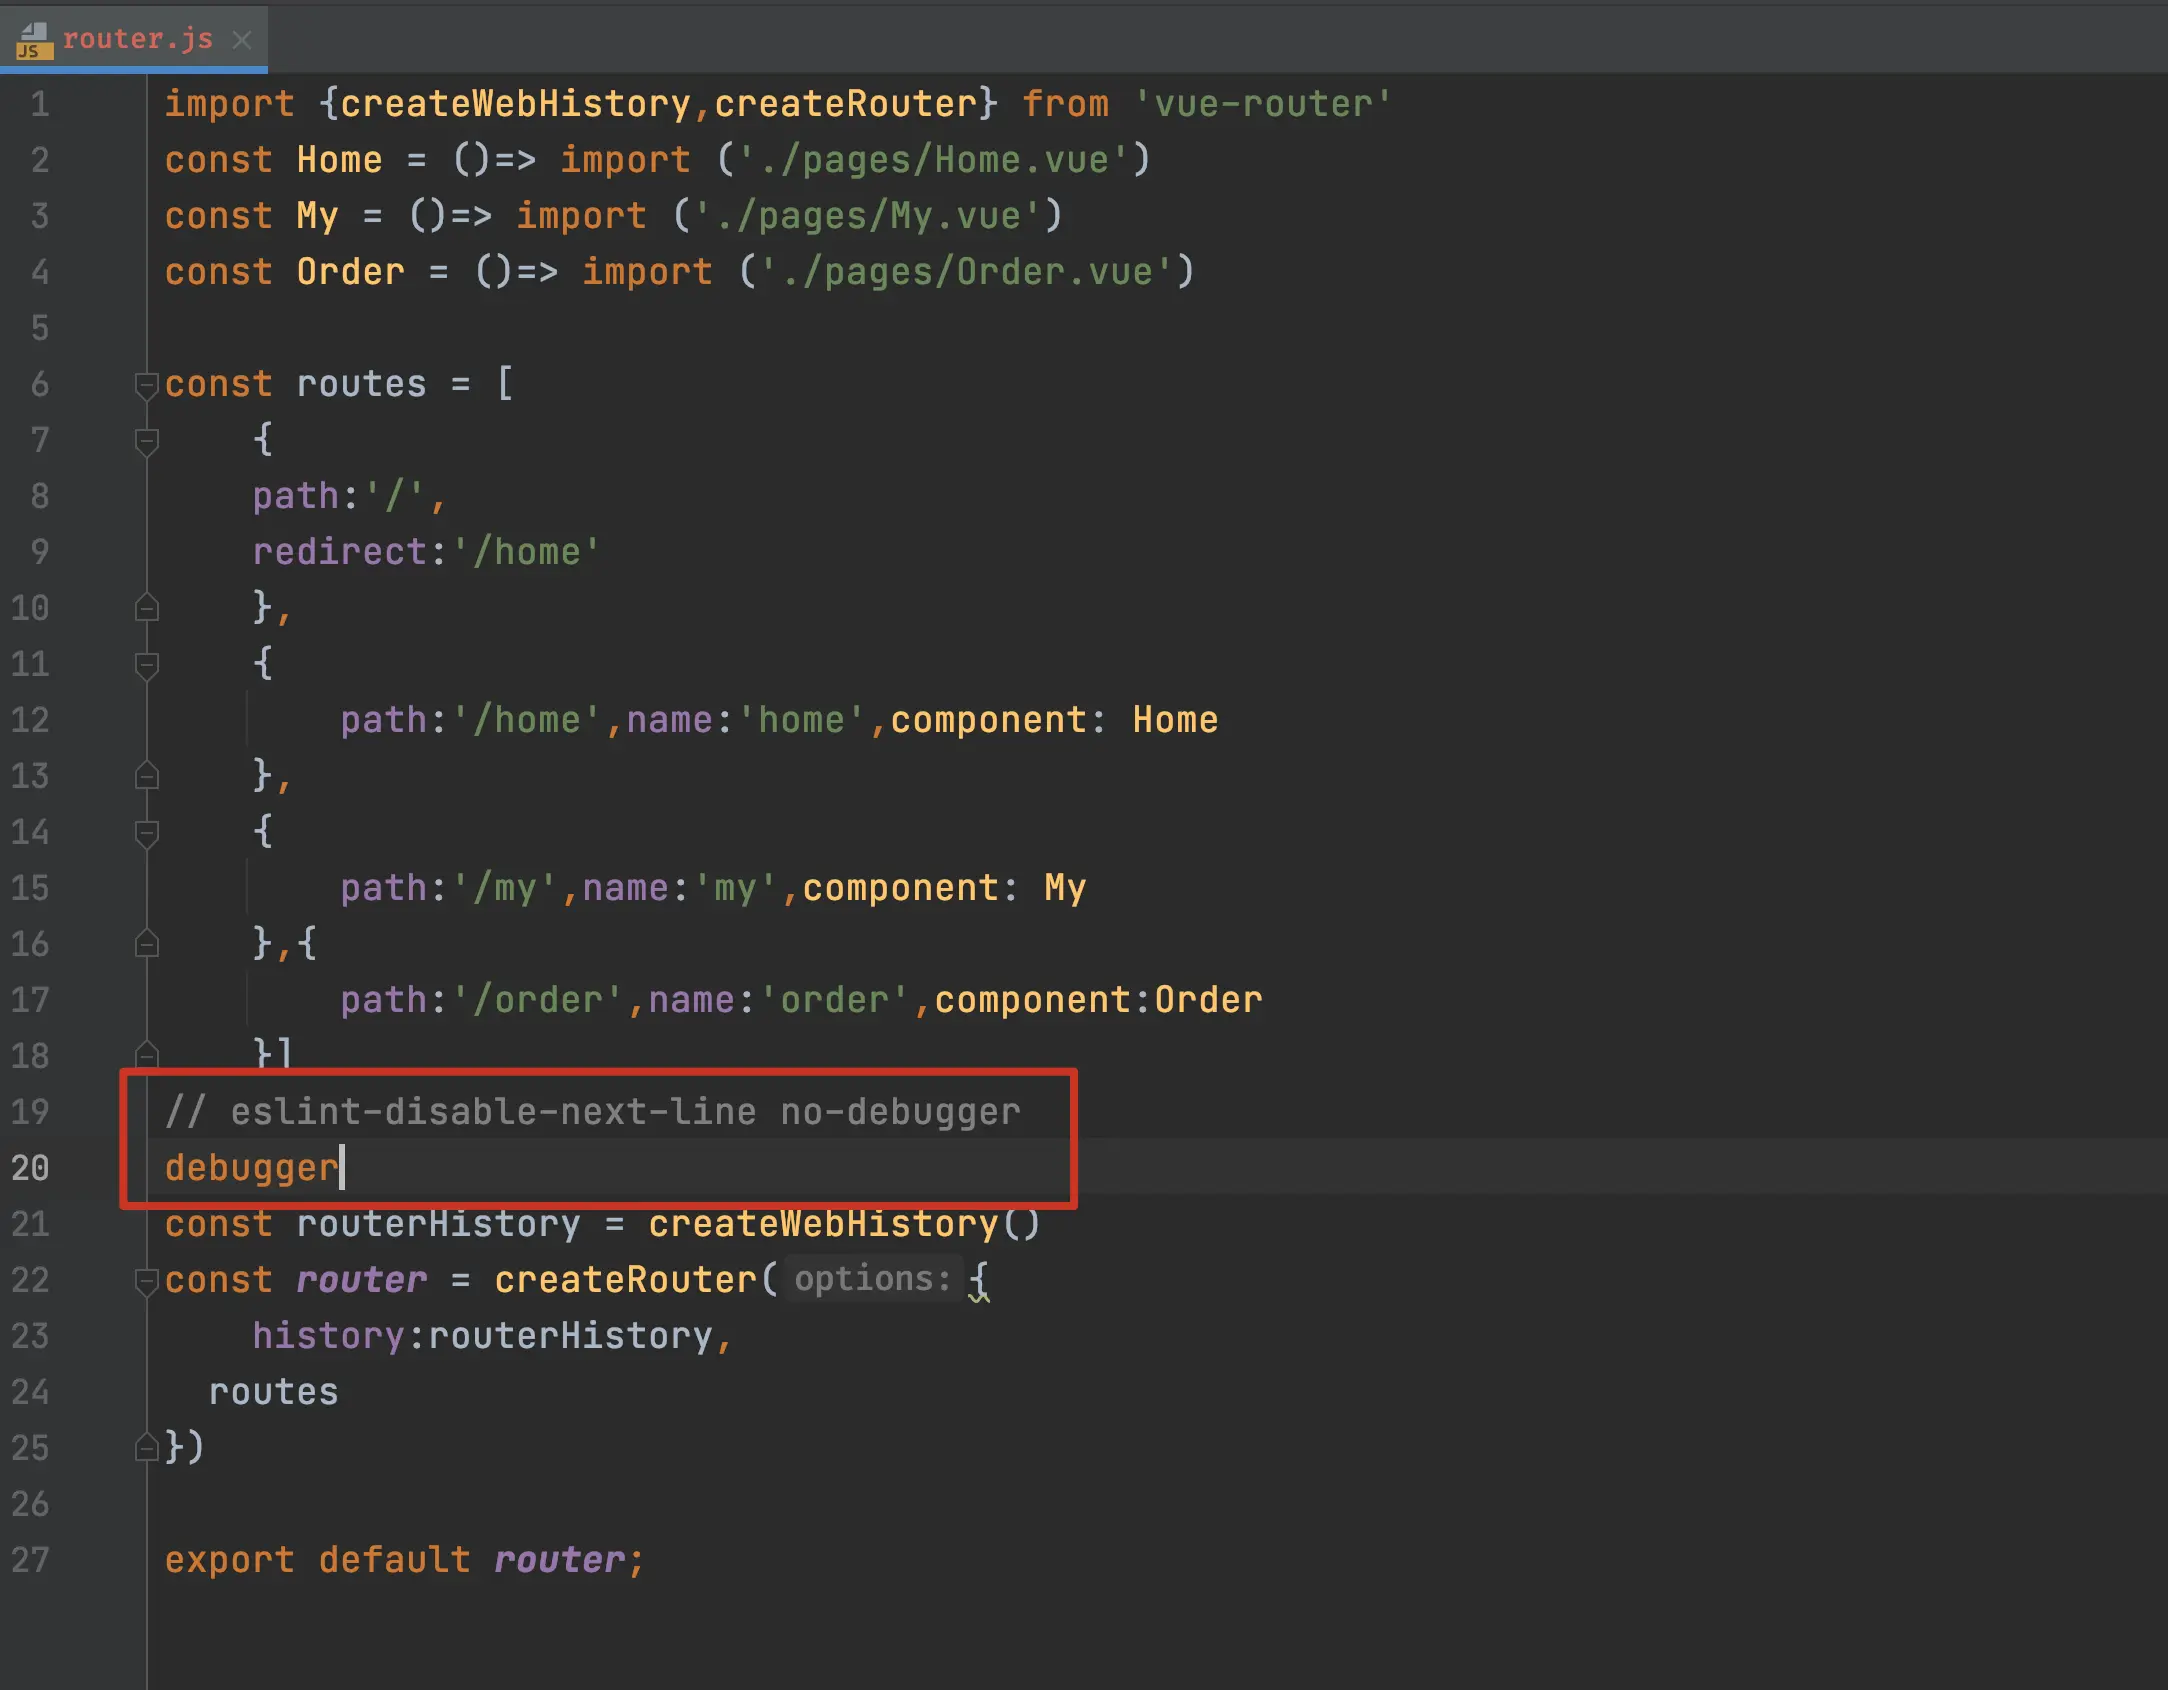
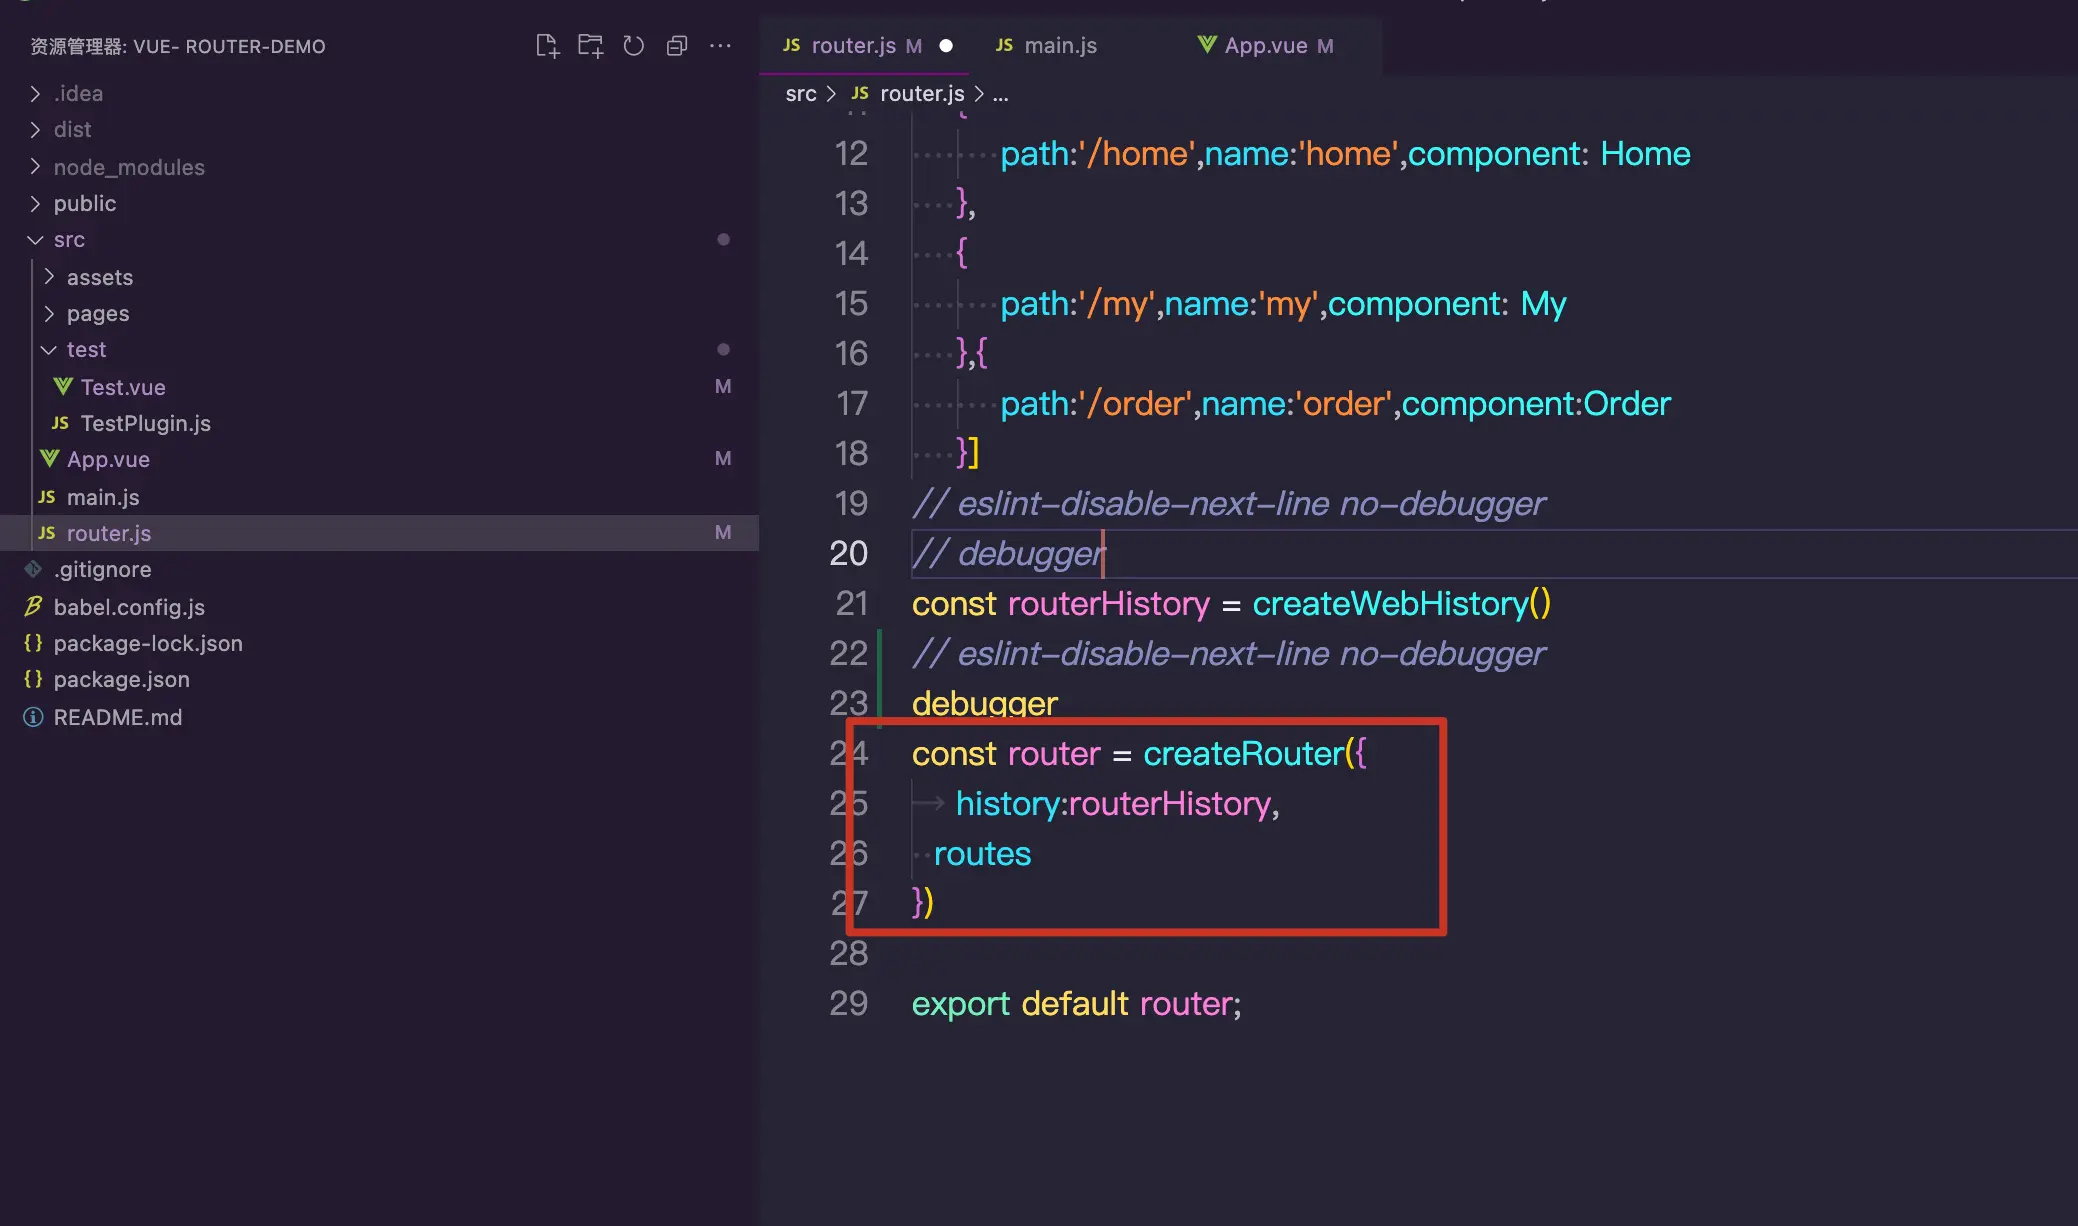
- 在 vscode 的 router.js 中添加 debugger 调试,没起作用,因此,该源码的调试是在 webstorm 中 debug 的。
- 项目启动之后,打开浏览器,点击刷新,会进入到调试处
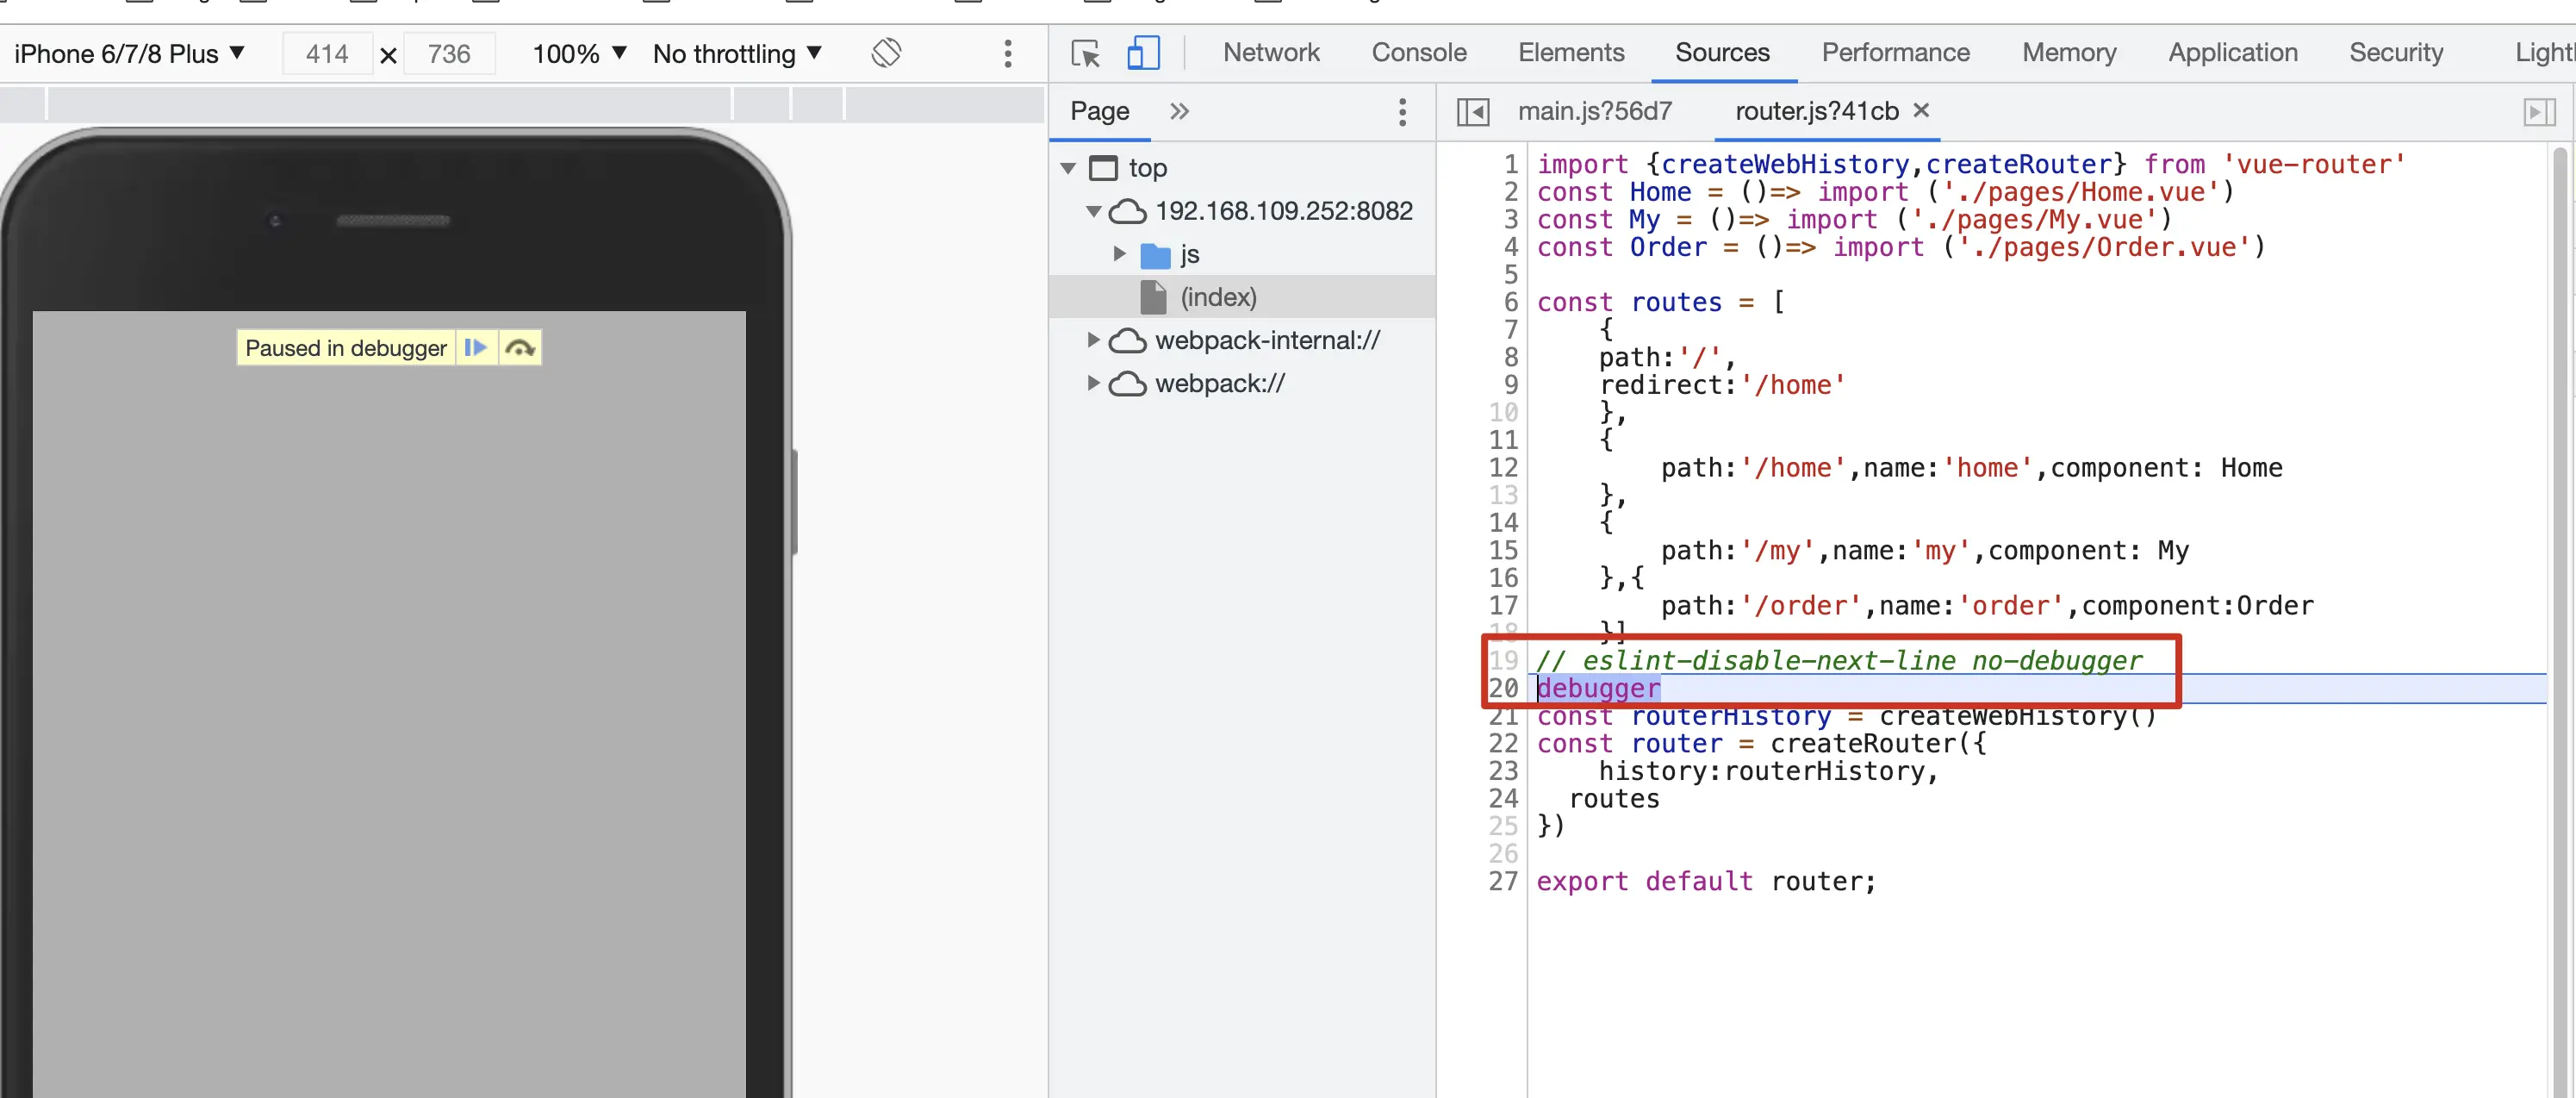
- 首先进入到createWebHistory方法中去(上图第 21 行代码),返回的 routerHistory 提供了一系列的工具方法(路由跳转、监听的事件方法等),具体实现源码以及注释如下:
function createWebHistory(base) {
  // 传入的base进行处理
  base = normalizeBase(base)

  //historyNavigation提供了一些方法:location/push/replace/state
  // 该方法的实现浏览器URL变化但页面不刷新(push),核心是使用了浏览器对象模型history.pushState()和history.replaceState()方法。
  const historyNavigation = useHistoryStateNavigation(base)

  //生成一个listener:destory和listen方法
  const historyListeners = useHistoryListeners(
    base,
    historyNavigation.state,
    historyNavigation.location,
    historyNavigation.replace
  )
  function go(delta, triggerListeners = true) {
    if (!triggerListeners) historyListeners.pauseListeners()
    history.go(delta)
  }

  //将上面的事件拼装到一起,生成一个routerHistory对象返回
  const routerHistory = assign(
    {
      // it's overridden right after
      location: '',
      base,
      go,
      createHref: createHref.bind(null, base),
    },
    historyNavigation,
    historyListeners
  )
  Object.defineProperty(routerHistory, 'location', {
    enumerable: true,
    get: () => historyNavigation.location.value,
  })
  Object.defineProperty(routerHistory, 'state', {
    enumerable: true,
    get: () => historyNavigation.state.value,
  })
  return routerHistory
}
返回 routerHistory 对象后,接着进入到createRouter方法中,源码以及注释如下:
// 从调用createRouter处,options中传入的参数为:history和routes
function createRouter(options) {
  // 第一步生成matcher,matcher的作用是实现路由匹配
  // createRouterMatcher会为每一个简单或复杂的路由生成一个正则表达式
    const matcher = createRouterMatcher(options.routes, options);
    let parseQuery$1 = options.parseQuery || parseQuery;
    let stringifyQuery$1 = options.stringifyQuery || stringifyQuery;

  // 拿到history对象,是createWebHistory或者为createWebHashHistory
    let routerHistory = options.history;
    if ((process.env.NODE_ENV !== 'production') && !routerHistory)
        throw new Error('Provide the "history" option when calling "createRouter()":' +
            ' https://next.router.vuejs.org/api/#history.');

  //一些路由守卫的初始化、useCallbacks方法返回一个闭包。
  //每一个路由守卫都对应了一个闭包(代码就不贴了,主要返回了三个方法:add,list,reset,主要作用是缓存路由守卫)。
    const beforeGuards = useCallbacks();
    const beforeResolveGuards = useCallbacks();
    const afterGuards = useCallbacks();

  // 生成默认router
    const currentRoute = shallowRef(START_LOCATION_NORMALIZED);
………………
//  一些初始化操作
………………
  // 这里的router即为最终的router对象,包含一系列的属性和方法
    const router = {
        currentRoute,
        addRoute,
        removeRoute,
        hasRoute,
        getRoutes,
        resolve,
        options,
        push,
        replace,
        go,
        back: () => go(-1),
        forward: () => go(1),
        beforeEach: beforeGuards.add,
        beforeResolve: beforeResolveGuards.add,
        afterEach: afterGuards.add,
        onError: errorHandlers.add,
        isReady,

      //此处的install方法是在执行app.user(router)的时候会执行到这里(即当这个router被返回到main.js后,下一步就会执行app.user(router),然后就会进入到这方法中去)
        install(app) {
            const router = this;

          //在此处注册了组件RouterLink和RouterView
            app.component('RouterLink', RouterLink);
            app.component('RouterView', RouterView);

          //全局主注册了$router $route
            app.config.globalProperties.$router = router;
            Object.defineProperty(app.config.globalProperties, '$route', {
                enumerable: true,
                get: () => unref(currentRoute),
            });
            if (isBrowser &&!started &&
                currentRoute.value === START_LOCATION_NORMALIZED) {
                started = true;

              //浏览器中push后,就会进行页面的渲染
                push(routerHistory.location).catch(err => {
                    if ((process.env.NODE_ENV !== 'production'))
                        warn('Unexpected error when starting the router:', err);
                });
            }
            const reactiveRoute = {};
            for (let key in START_LOCATION_NORMALIZED) {
                reactiveRoute[key] = computed(() => currentRoute.value[key]);
            }

          // 使用app.provide来做组件的传递
          // router-view和router-link中的参数是通过这里传递下去的
          // 关于provide的用法,见本节内容往下
            app.provide(routerKey, router);
            app.provide(routeLocationKey, reactive(reactiveRoute));
            app.provide(routerViewLocationKey, currentRoute);
            let unmountApp = app.unmount;
            installedApps.add(app);
            app.unmount = function () {
                installedApps.delete(app);
                if (installedApps.size < 1) {
                    removeHistoryListener();
                    currentRoute.value = START_LOCATION_NORMALIZED;
                    started = false;
                    ready = false;
                }
                unmountApp();
            };

        },
    };
    return router;
6-5 vue3 高级特性:vue 插件+provide 跨组件通信
浏览器中如何实现 URL 变化但页面不刷新
- 在控制台直接输入 history.pushState(null,null,'/Order'/),会发现浏览器窗口中地址发生了改变,但页面未刷新。
- onpopState 事件主要用来监听路由回退的操作。
- 调试源码的步骤是,写一个 click 方法,点击 debuger 进行操作
<button @click="jump">Jump</button>
………………
<script>
import { useRouter } from 'vue-router'
export default {
  name: 'App',
  setup(){
    const router = useRouter();
    return{
      jump(){
        // eslint-disable-next-line no-debugger
        debugger
        router.push('/order')
      }
    }

  }
}
</script>
然后 step into 到 router.push 方法中,由此开始调试,进入 pushWithRedirect()方法中(如下图)
然后一步一步的,调试源码到最后,最终会通过 history.pushState()方法,来改变地址而不发生页面的更新。
在上图的高亮部分 resolve(to)是路由匹配的相关实现,下节继续。
6-7 vue-router 路由匹配源码分析
我们输入路由后如何与我们自己定义的 routes 中的路由进行匹配,就涉及到 vue-router 的核心概念 matcher。 两个关键点是:createRouter 以及上一节提到的 resollve 方法。
本节重点讲解这个 resolve 方法,我们假定从 /home 跳转到/order,代码以及注释如下:
function resolve(rawLocation, currentLocation) {
  // 第一步是拿到currentLocation,即当前路由相关信息 【/home相关的】
        currentLocation = assign({}, currentLocation || currentRoute.value);

  // 判断传进来的路由‘/order’参数是不是string
        if (typeof rawLocation === 'string') {

          //进行一个形式的格式化吧
            let locationNormalized = parseURL(parseQuery$1, rawLocation, currentLocation.path);

          //最关键的一步是调用matcher下的resolve方法,传入两个参数 ‘/order’和‘/home’,到这里我们需要继续step into到这个方法中去调试。关键代码为: matchers.find(m => m.re.test(path));
            let matchedRoute = matcher.resolve({ path: locationNormalized.path }, currentLocation);
            let href = routerHistory.createHref(locationNormalized.fullPath);
            if ((process.env.NODE_ENV !== 'production')) {
                if (href.startsWith('//'))
                    warn(`Location "${rawLocation}" resolved to "${href}". A resolved location cannot start with multiple slashes.`);
                else if (!matchedRoute.matched.length) {
                    warn(`No match found for location with path "${rawLocation}"`);
                }
            }
            // locationNormalized is always a new object
            return assign(locationNormalized, matchedRoute, {
                params: decodeParams(matchedRoute.params),
                hash: decode(locationNormalized.hash),
                redirectedFrom: undefined,
                href,
            });
        }
        …………………………………………
    }
6-8 vue3 新特性 defineComponent 讲解 1 && 6-9 vue3 新特性 defineComponent 讲解 2
router-view 如何实现组件动态渲染(涉及 Vue 动态组件)
本节从 router 对象的 install 方法开始,找到 app.component('RouterView',RouterView)。
2328 行定义:const RouterView = RouterViewImpl;
RouterView 就是 RouterViewImpl 方法,该方法源码如下
通过** 6-10 章节所示源码,我们看到 router-view 组件是以纯 js 实现的方式,使用defineComponent定义组件,组件的渲染使用了h**函数。
在进一步看源码之前,我们先来写个 demo 看 如何使用纯 js 方式编写组件。
h 函数包含的三个参数为:dom 标签、dom 中需要绑定的一些属性、dom 当中的 children。
下面为代码演示,注释部分为直接使用 Home 组件的渲染。
import { defineComponent, h } from 'vue'
// import  Home from '../pages/Home';
const TestComponent2 = defineComponent({
  name: 'TestComponent2',
  props: {},
  setup(props, { slots }) {
    return () => {
      return h(
        'div',
        {
          class: 'test-component2',
          onClick() {
            alert('click')
          },
        },
        slots.default()
      )
    }
    // return () =>{
    //     return h(Home,{
    //         onClick(){
    //             alert('You Clicked the Home Component!')
    //         }
    //     })
    // }
  },
})

export default TestComponent2
6-10 深入解析 router-view 源码
const RouterViewImpl = /*#__PURE__*/ defineComponent({
  name: 'RouterView',
  inheritAttrs: false,
  props: {
    name: {
      type: String,
      default: 'default',
    },
    route: Object,
  },
  // setup在整个组件初始化的时候只会执行一遍,但下面的render function,也就是40行的return部分会执行多次
  setup(props, { attrs, slots }) {
    process.env.NODE_ENV !== 'production' && warnDeprecatedUsage()
    // injectedRoute决定router-view的刷新
    const injectedRoute = inject(routerViewLocationKey)
    // injectedRoute.value
    const routeToDisplay = computed(() => props.route || injectedRoute.value)
    const depth = inject(viewDepthKey, 0)
    const matchedRouteRef = computed(() => routeToDisplay.value.matched[depth])
    provide(viewDepthKey, depth + 1)
    provide(matchedRouteKey, matchedRouteRef)
    provide(routerViewLocationKey, routeToDisplay)

    // 空的ref用来装载马上要渲染的view-router实例
    const viewRef = ref()
    watch(
      () => [viewRef.value, matchedRouteRef.value, props.name],
      ([instance, to, name], [oldInstance, from, oldName]) => {
        if (to) {
          to.instances[name] = instance
          if (from && from !== to && instance && instance === oldInstance) {
            if (!to.leaveGuards.size) {
              to.leaveGuards = from.leaveGuards
            }
            if (!to.updateGuards.size) {
              to.updateGuards = from.updateGuards
            }
          }
        }
        if (
          instance &&
          to &&
          (!from || !isSameRouteRecord(to, from) || !oldInstance)
        ) {
          ;(to.enterCallbacks[name] || []).forEach((callback) =>
            callback(instance)
          )
        }
        // 默认为pre属性,post在页面渲染之后执行 watch 监听
      },
      { flush: 'post' }
    )
    return () => {
      const route = routeToDisplay.value
      const matchedRoute = matchedRouteRef.value
      const ViewComponent = matchedRoute && matchedRoute.components[props.name]
      const currentName = props.name
      if (!ViewComponent) {
        return normalizeSlot(slots.default, { Component: ViewComponent, route })
      }
      const routePropsOption = matchedRoute.props[props.name]
      const routeProps = routePropsOption
        ? routePropsOption === true
          ? route.params
          : typeof routePropsOption === 'function'
          ? routePropsOption(route)
          : routePropsOption
        : null
      const onVnodeUnmounted = (vnode) => {
        // remove the instance reference to prevent leak
        if (vnode.component.isUnmounted) {
          matchedRoute.instances[currentName] = null
        }
      }
      const component = h(
        ViewComponent,
        assign({}, routeProps, attrs, {
          onVnodeUnmounted,
          ref: viewRef,
        })
      )
      return (
        normalizeSlot(slots.default, { Component: component, route }) ||
        component
      )
    }
  },
})